VoIP with FreePBX
FreePBX is an open source GUI used to manage your PBX. This guide below will show you how to setup AlienVoIP SIP Trunks with FreePBx. This is a common setup when using any VoIP provider SIP Trunks.
1. Login to your
FreePBX.

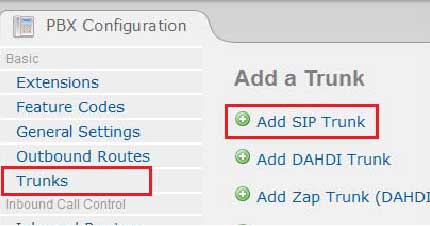
2. Go to
Connectivity > Trunks.

3. Click Add SIP Trunk.

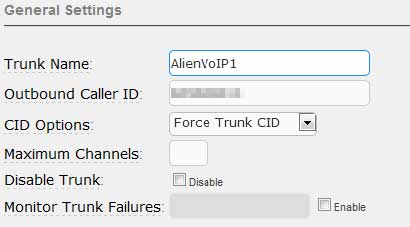
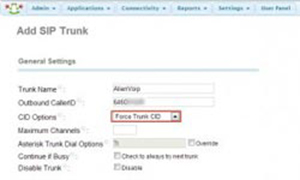
4. Key in
Trunk Name and
SIP number (OutBound CallerID). Then, select
Force Trunk CID as CID Options.
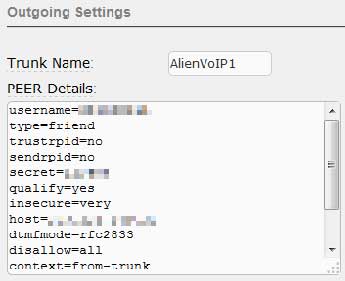
5. Scroll down to
Peer Detail, copy the following scripts and register string. Then paste them in the columns accordingly as shown below.
username=****** SIP Number *****
secret=***** SIP Password ****
type=friend
host=sip1.alienvoip.com
port=5060
context=from-trunk
nat=route
canreinvite=no
disallow=all
allow=g729&g723&gsm
dtmfmode=rfc2833
qualify=yes
trustrpid=no
sendrpid=no
insecure=very
Register String:
SIP Number:SIP Password@Sip1.alienvoip.com/SIP Number
Please click above to enlarge image.
Click “Submit Changes” after you have filled in the details accordingly.

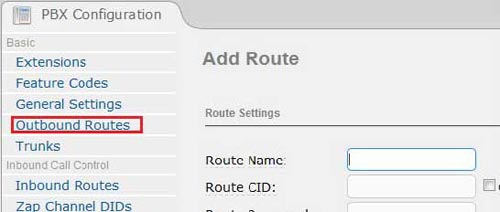
6. Go to
Connectivity > Outbound Routes.

7. Insert your
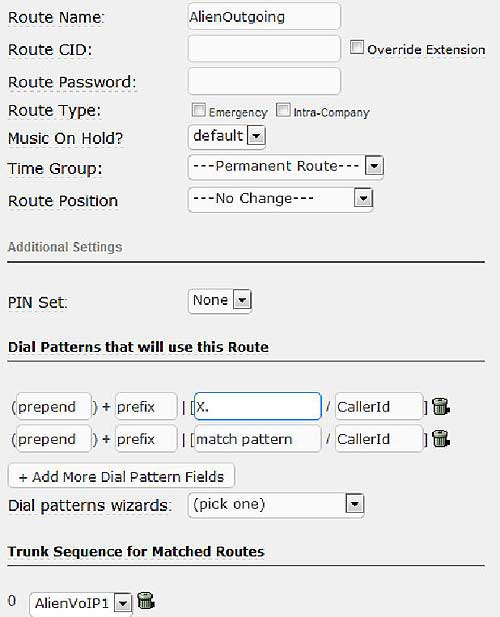
Route Name and key in the dial patterns as _XXXX .
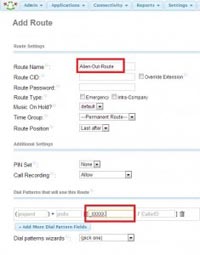
8. Scroll down and select
AlienVoIP as Trunk Sequence for Matched Routes.
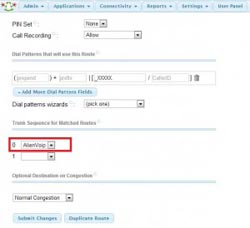
9. Click
Submit Changes to apply configuration.

10. You can start using your FreePBX and enjoy AlienVoIP’s services now!
Using AlienVoIP with Asterisk
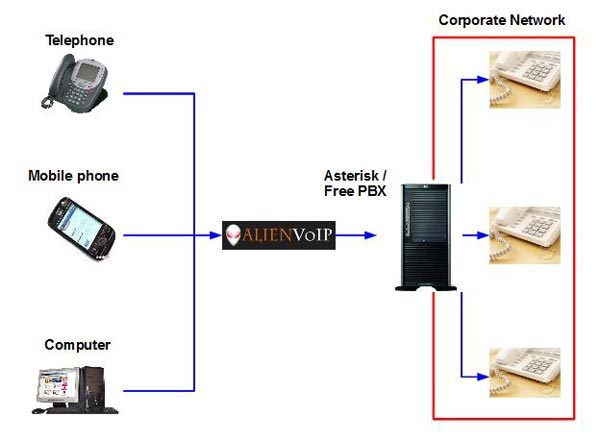
AlienVoIP connect to Asterisk or FreePBX
Asterisk or FreePBX is an open source server based PBX system. It is widely used by business owners because its flexibility and lower cost. AlienVoIP is running on
SIP protocol, hence it can be connected to any Asterisk based system.
After configure with AlienVoIP SIP account, the Asterisk/FreePBX is able to make calls to PSTN network, which includes all mobile operators and fixed lines.
Besides, by using AlienVoIP SIP trunking in Asterisk, the whole office will benefit from low cost communication while maintaining the voice quality. At the same time, the Asterisk PBX can be configure with dial plan to suit with the environment’s requirements. For instance, some calls are directed to AlienVoIP (specially oversea calls) and some are still using local provider.
Asterisk Installation & Configuration
Before attempting to configure your Asterisk server, make sure that you are registered to AlienVoip and your account is activated with credits and at least 1 SIP username.
The guide below assumes that you have an Asterisk server already running and have completed the necessary steps mentioned above and agreed to our terms and conditions.
Step 1
Configure your sip.conf file, by default, the file is located in /etc/asterisk/sip.conf
[general] ; General setup
bindport=5060
bindaddr=0.0.0.0
context=default
defaultexpirey=3600
maxexpirey=3600
rtptimeout=60
rtpholdtimeout=300
rtpkeepalive=1
dtmfmode=rfc2833
nat=yes
disallow=all
allow=g729
qualify=yes
registertimeout=60
; Register your AlienVoip SIP username and password to AlienVoip’s SIP server
register => 605600110:password:605600110@sip1.alienvoip.com:5060/605600110
; Setup an account
[alienvoip] ; Give your gateway a meaningful name
port=5060 ; AlienVoip uses port 5060 for voip authentication
type=friend ; Set this to friend
secret=password ; This is your password for your SIP username
username=605600110 ; This is your SIP username
fromuser=605600110 ; This is your SIP username
host=sip1.alienvoip.com ; This is where AlienVoip’s sip registration server is located
canreinvite=no
qualify=yes
nat=yes ; Depending on your network condition, if your Asterisk is located behind a router,
; set it to yes, if your asterisk server has a public IP of its own, set it to no
context=INCOMING ; If your asterisk server allows incoming AlienVoip to AlienVoip calls, give
; this a meaningfull context
disallow=all ; First disallow all codecs
allow=ilbc ; Allow codecs in order of preference
; see doc/rtp-packetization for framing options
[101] ; Register an account for your SIP client
username=101
callerid=testing <101>
secret=101
regexten=101
host=dynamic
nat=yes
canreinvite=no
type=friend
qualify=yes
context=alienvoip
disallow=all
allow=ilbc
allow=gsm
dtmfmode=rfc2833
canreinvite=no
Step 2
Configure your extension.conf file to use the SIP user you have just defined in sip.conf, by default, the file is located in /etc/asterisk/extensions.conf
[alienvoip]
exten => _X.,1,NoOp()
exten => _X.,n,Dial(SIP/alienvoip/${EXTEN},60)
exten => _X.,n,Hangup()
The example above is a general view of a basic dialplan in Asterisk, you can configure your dialplan to suit your need in your production server.
Once you have done all necessary configurations above, your server is ready to make calls to AlienVoip
Please contact our team if you need any support to configure SIP trunk at your PBX.
Using AlienVoIP with ElastixPBX
Step 1
Please login to your ElastixPBX system.
Step 2
Go to PBX tab as shown.
Step 3
Go to ‘Trunks’ located on the side bar, then click on ‘Add SIP Trunk’
Step 4
Fill up the your SIP account information as shown below.
Trunk Name: Give a meaning full name to your trunk
Outbound Caller ID: This should be your SIP username
CID Options: Please set it to “Force Trunk CID”
Step 5
Fill up outgoing details as shown below.
Trunk Name: Should be the same as trunk name you have given in step 4
Peers Details: Please copy from text below to fill it up, replacing username and secret with your SIP username and SIP password.username=123456789
type=friend
trustrpid=no
sendrpid=no
secret=password
qualify=yes
insecure=very
host=sip1.alienvoip.com
dtmfmode=rfc2833
disallow=all
context=from-trunk
canreinvite=no
allow=g729,g723,gsm
Step 6
Leave incoming settings empty, skip to registration, replace with appropriate values and submit your changes.
605600110:password@sip1.alienvoip.com/605600110
Step 7
Next, go to Outbound Routes to add a route.
Route Name: Give your route name a meaning full name
Dial Patterns: Follow the pattern as shown in the image
Trunk: Choose the trunk that you have just created
And then submit your changes.
Once you have registered an extension to your ElastixPBX, any calls made should be routed through AlienVoIP.
Using AlienVoIP with 3CX Phone System (PBX)
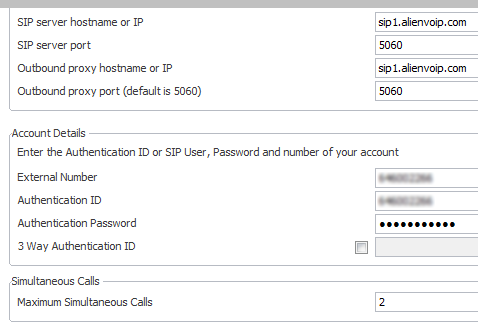
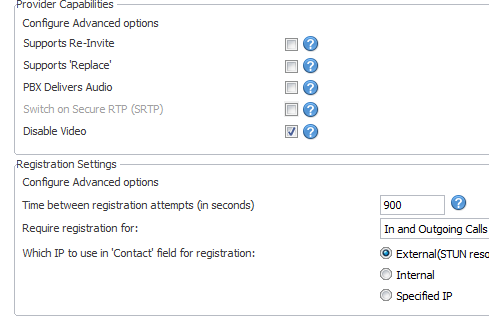

*Please click on image to view clearer.

Below is the settings that worked. - The first step will be to make sure the provider is registered.
- Then, proceed to the settings in the first General tab (Provider Capabilities & Registration Settings).
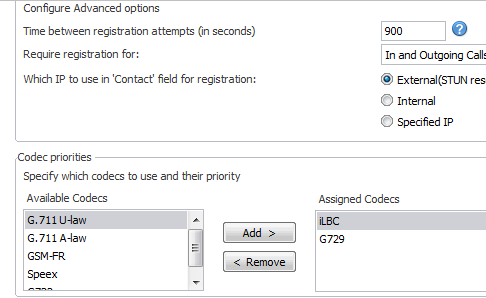
- After completing the General Tab settings, please go to “Configure Advanced Options” tab. As you can see, we have disabled some options at “Provider Capabilities”. Please take note on the assigned codecs. Set “ilbc” as the first codec , then followed by G729.
- Go to “Remote Connections” and you should see that the status is registered.
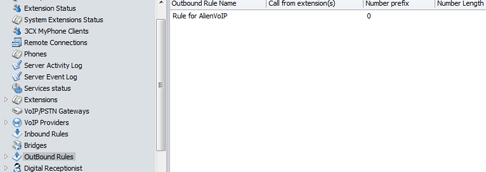
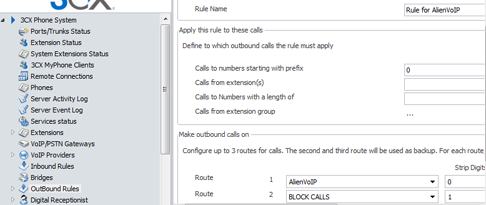
- Next, go to “Outbound Rules”.
- The rule sends any call starting with 0 to Alien VoIP. It’s a simple rule to test the route.
- Lastly, you should make sure that your extension is registered.


